The eCommerce tab displays any existing eCommerce Interfaces which have been configured as well providing the ability to configure new eCommerce Interfaces.
The eCommerce tab can be enabled by going to the Subscriptions tab, pressing the "Update Plan" button next to the Subscription that requires the eCommerce Interface, adding the number of required ECommerce Interfaces and finally pressing the "Accept" button to apply the change.
The generic process involved in enabling the eCommerce tab is outlined in further detail below.
For further information about configuring a particular Interface, refer to the Interface's topic in the User Guide under Idealpos Online -> Settings -> eCommerce.
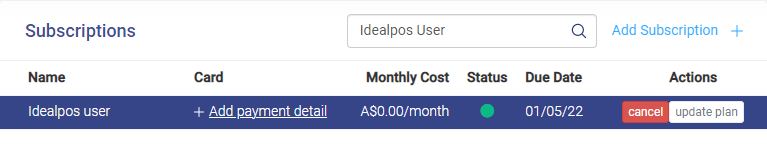
Go to the Subscriptions tab and press the 'Update Plan' button next to the Subscription as per the below screenshot.
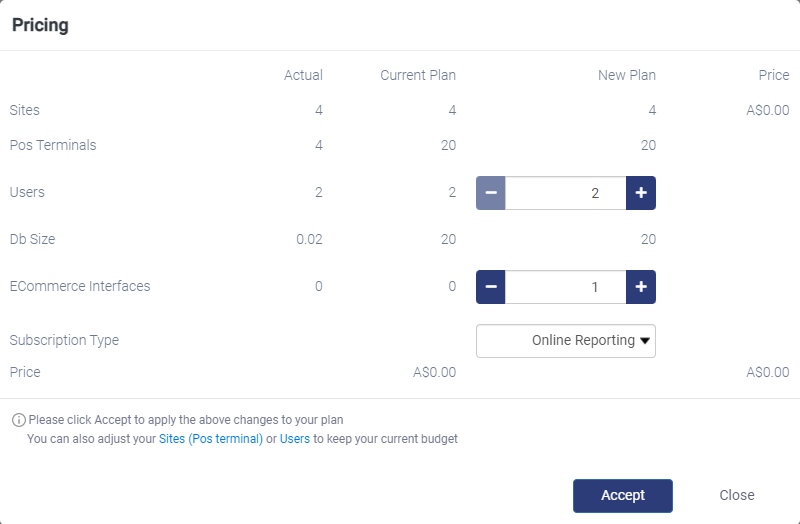
The Pricing screen will appear. Press the '+' button on the ECommerce Interfaces row to increase the ECommerce Interfaces to the number of required ECommerce Interfaces.
If required, the '-' button can be used to decrease the number of ECommerce Interfaces. Typically, you'll use one interface for each POS terminal. If you'll only have one POS terminal processing eCommerce orders for one type of Interface, you'll only require one ECommerce Interface. If multiple terminals will be used to process eCommerce orders, ensure that you select the required number of ECommerce Interfaces. Press the "Accept" button once you have finished selecting the required number of ECommerce Interfaces.
Shortly after pressing the "Accept" button to update the plan, the eCommerce tab will appear.
Detailed steps involving the configuration for each type of eCommerce Interface are outlined separately on each interface's page in the User Guide.
The below is a generic outline of the process involved in setting up an eCommerce Interface in Idealpos Online.
When opening the eCommerce tab while there are no eCommerce interfaces configured, the eCommerce tab will appear as a clean-slate with no entries.
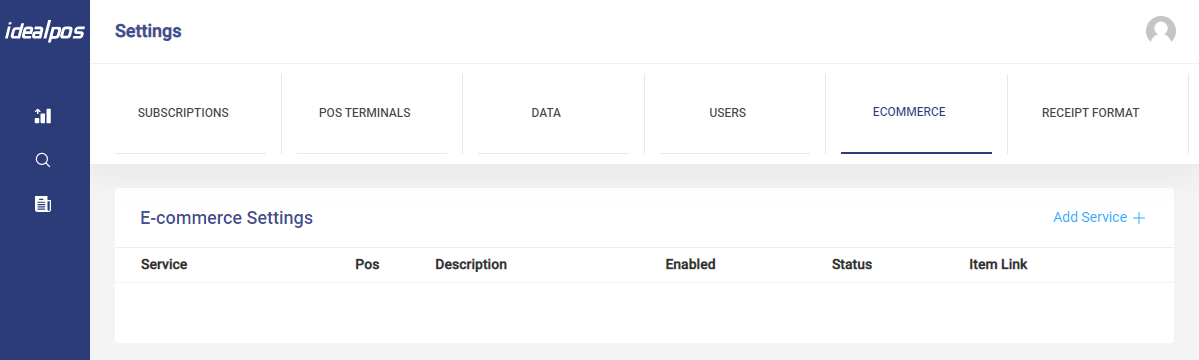
To add a new eCommerce Interface, press the "Add Service +" button.
The Add Service screen will appear as below.
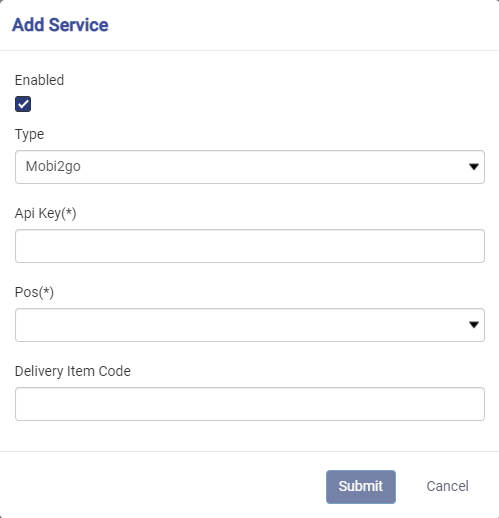
The screen contains the following settings (note that settings will vary depending on the Interface Type that has been selected - refer to the specific Interface Type's topic for further details on setting up that Interface Type)
Enabled: Ticked by default and must remain ticked in order for the service to function
Type: Select the type of eCommerce Service being configured.
Api Key: Enter the API Key for the eCommerce Service. The API Key can be retrieved by logging into the eCommerce service website and looking for the API Key. The API Key is typically listed on a Settings or Account page within the eCommerce website. If you need more information regarding the retrieval of the API Key, refer to the eCommerce website help topics for more information. Note that you may need to generate the API Key via a "Generate API Key" button on the eCommerce website if a key hasn't been previously generated.
Pos: Select the POS terminal from the dropdown list which will be used for processing eCommerce orders.
Delivery Item Code: Enter the Delivery Item Code which will be used .
For instructions that are specific to an interface, click on the interface type below.